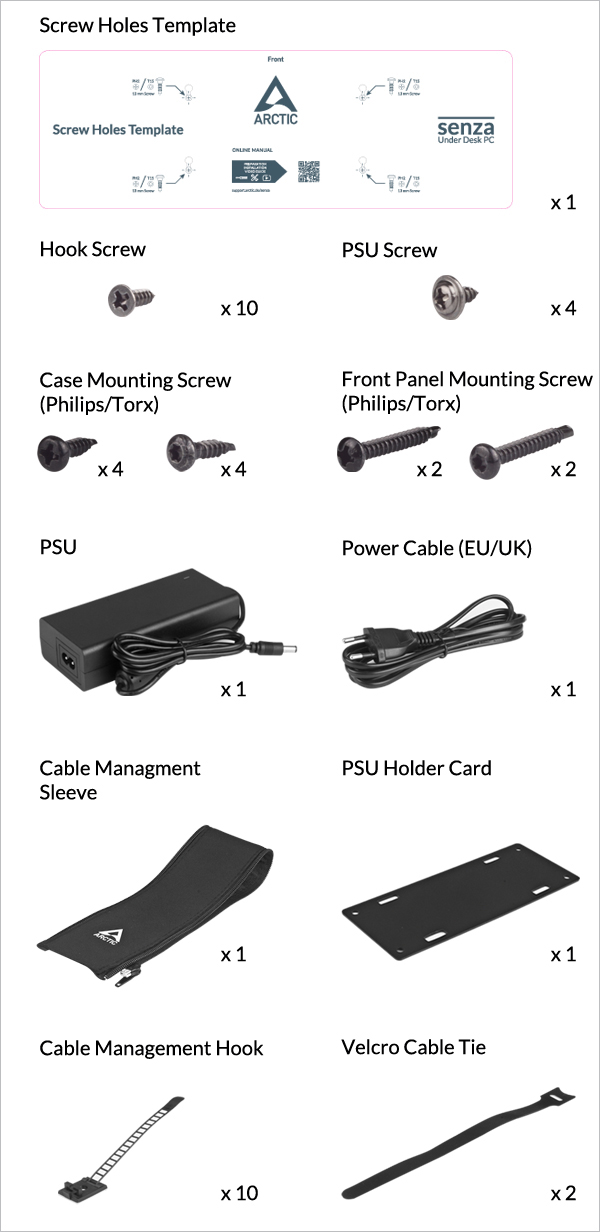
Required Tools
Highly Recommend Electric Screwdriver
 PH2 Philips Head Screwdriver
 T15 Torx Screwdriver
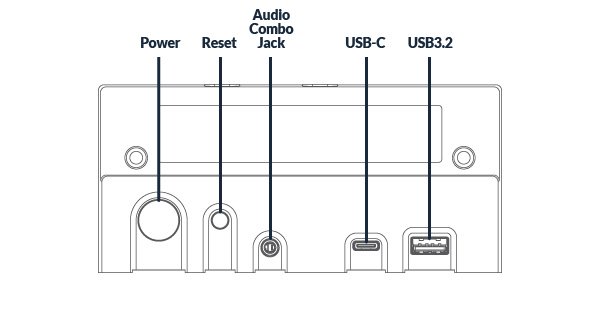
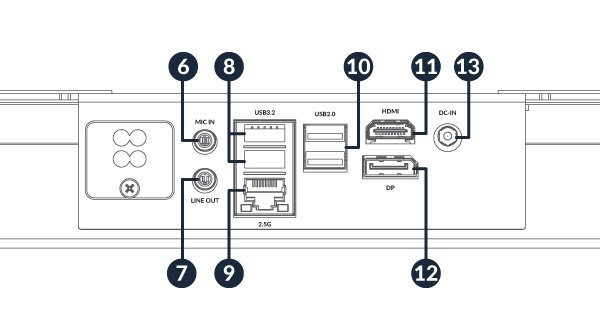
- Power button
- The Power button turns your Senza on and off. You can use it to put your Senza to sleep mode by pressing it once when it's on. You can force your Senza to shut down by pressing this button for 10 seconds.
- Reset button
- The reset button allows you to restart your Senza in any circumstances.
- 3.5 mm TRRS audio port (Headphone/Headset)
- This port is used to connect audio devices such as headsets, headphones, or amplified speakers and allows simultaneous use of headphones and a microphone with a single connection on a PC.
- USB3.2 Gen1 Type-C Port
- This USB-C port provides a transfer rate of up to 10 Gbps.
- USB3.2 Gen1 Port
- This USB3.2 Gen1 port provides a transfer rate of up to 5.0 Gbps.
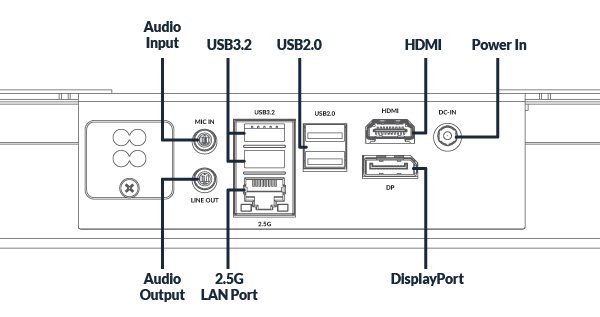
- 3.5mm audio input (MIC)
- This port is for connecting a microphone with a 3.5 mm jack connector, which can be used for video conferencing and recording.
- 3.5mm audio output port (Headphone/ Speaker)
- This port is for connecting audio output devices, such as headphones or amplified speakers, using a 3.5 mm jack connector, enabling playback of sound from the PC.
- USB3.2 Gen2 Ports
- These USB3.2 Gen2 ports provide a transfer rate of up to 10.0 Gbps.
- 2.5G LAN port
- This port, used with an Ethernet cable with an RJ45 connector, connects the PC to a network or the internet.
- USB2.0 port
- The USB (Universal Serial Bus) port can compatible with USB2.0 and USB1.1 devices such as keyboards and mouse, thumb drives, speakers and printers.
- HDMI port
- The HDMI2.0 port can deliver uncompressed, fully digital audio/video signal, which supports a Full-HD device such as an LCD TV or monitor.
- DisplayPort
- The DisplayPort 1.2 port can deliver uncompressed, fully digital audio and video signals, supporting high-resolution devices such as a Full-HD or 5K2K monitor.
- Power input
- The port is to plug in the power supply. To prevent damaging the Senza, please always use the supplied power.
- WARNING! The temperature of the power adapter will rise and it may become hot when it's in use. Do not cover the power adapter and keep it away from your body.
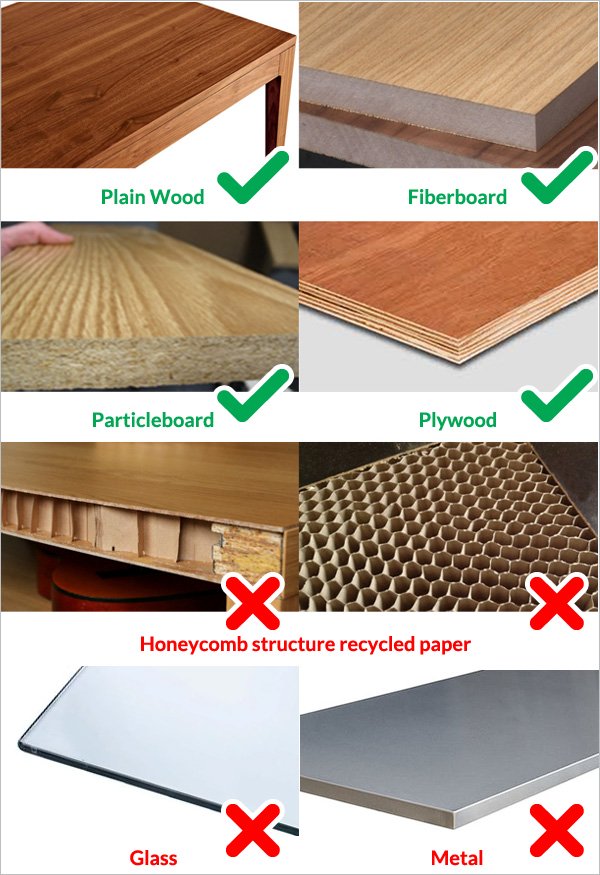
Minimum size recommended
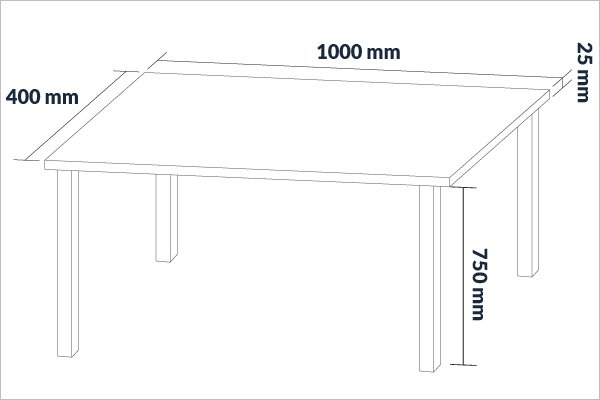
Main Device

You can download the printable template here, for your moving or pre-measuring


Warning
To ensure proper installation of the Senza, the screws should be tightened all the way to the shoulder.

Overtightening them may lead to hard to secure the device in place.
Too loose may lead the Senza fell.


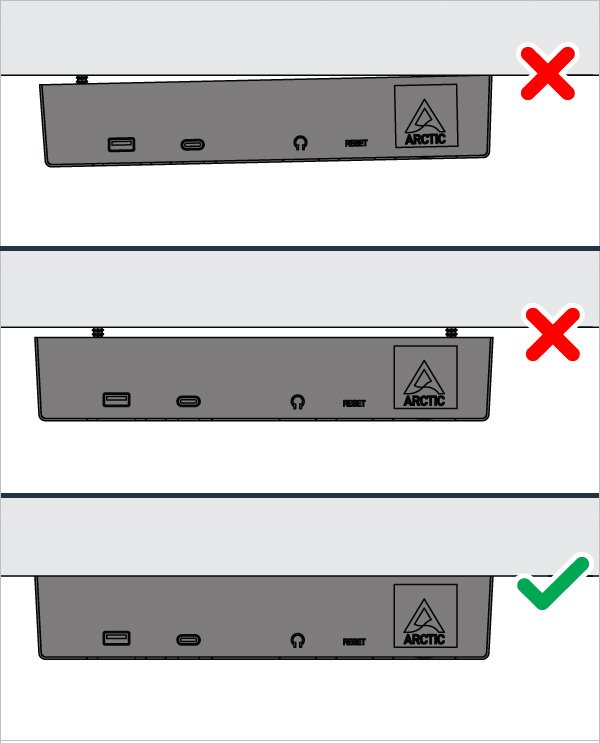
Front Panel


 Attention
Incorrect installation may cause safety problems.
PSU


WARNING! The temperature of the power adapter will rise and it may become hot when it's in use. Do not cover the power adapter and keep it away from your body.
Cable Management Hook

Stick the cable tie to any place you want to manage your cable.


Cable Management Sleeve

We recommend you use it for the monitor cables
The below configuration are necessary to install the media features that are missing in Windows 11 Home N and Windows 11 Pro N.
Important: For Windows 11 24H2 and later, DISM batch installation may fail. Please use the Windows Settings UI to install the Media Feature Pack while ensuring your internet connection and Windows Update service are active.
Install Media Feature Pack
To activate the full media functionality, it is advisable to install the Media Feature Pack. This package provides media-related technologies and certain pre-installed media apps that are not included in the N editions of Windows.
Select in the Start menu, under Settings > System > Optional Features. Select Show Features next to Add Optional Feature, and then select the Media Feature Pack from the list of available features.
Note: You will not be prompted to restart the computer, but the computer must be restarted to successfully complete the installation.
Alternatively, you can open a command prompt in administrator mode and run below command:
DISM /Online /Add-Capability /CapabilityName:media.MediaFeaturePack~~~~0.0.1.0
The above code can also be run by downloading below file and executing it as administrator.
Install Media Feature PackInstall Additional Drivers
Additional drivers may be required for specific applications to run properly. You can install them from the Microsoft Store with below links.
Install VP9 Video Extension Install HEIF image Extension Install Web Media Extension Install AV1 Video Extension Install MPEG-2 Video ExtensionHow to set up USB Wake?
- Enter the BIOS
- Turn off your PC
- Hold Del Button
- Press power button

- Press the ← → buttons to access the "Advanced" tab

- Press ↑ ↓ to navigate to "USB Wake" and then press Enter

- Enable "USB Wake" and press Enter again
The display specifications please see this table below.
| Max. Refresh Rate | 1920x1080 | 2560x1080 | 2560x1440 | 3440x1440 | 3840x1080 | 3840x2160 | 5120x1440 | 5120x2160 |
|---|---|---|---|---|---|---|---|---|
| DP (mit Bild) | 240 Hz | 165 Hz | 165 Hz | 120 Hz | 144 Hz | 75 Hz | 90 Hz | 60 Hz |
| HDMI (mit Bild) | 240 Hz | 165 Hz | 144 Hz | 90 Hz | 120 Hz | 60 Hz | 75 Hz | 50 Hz |
The data is for reference only. Please refer to the actual situation when using the data.
And please aware that the daisy chain screen can only be supported by the DisplayPort on Senza, maximum 3 screens at the same time.
- For 2 same screens: up to 4K (3840*2160) @30Hz; 2K@75Hz, 1080p@144Hz.
- For 3 same screens: up to 2K@60Hz, 1080p@100Hz.
Recommended Products

