Un guide de démarrage rapide imprimable est disponible ici.
Pour vérifier la compatibilité de votre carte mère, veuillez suivre ce lien.
Pour vérifier la compatibilité de votre carte graphique, veuillez suivre ce lien.
Outils requis
 Tournevis cruciforme PH2
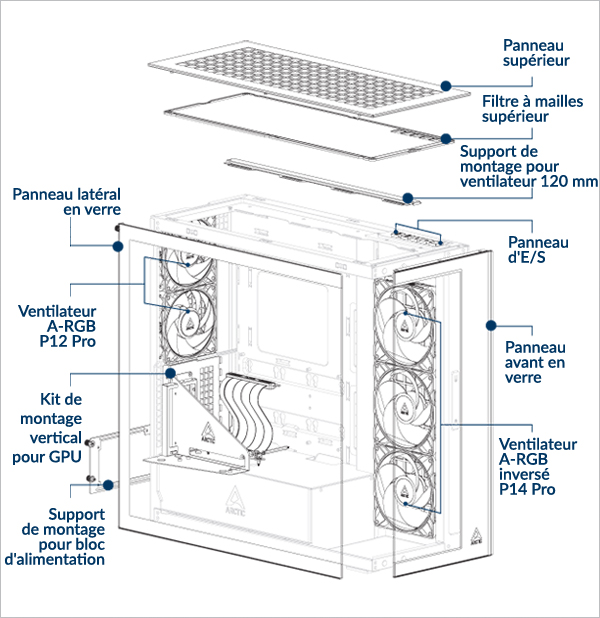
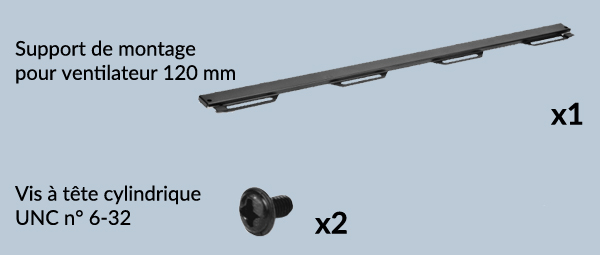
Contenu de l'emballage

Dégagements et spécifications
Si vous utilisez le refroidisseur tout-en-un Liquid Freezer III Pro avec un support GPU vertical, alors :
Pour les plateformes AMD : il est recommandé que la largeur de votre carte graphique ne dépasse pas 130 mm.
Pour les plateformes Intel : il est recommandé que la largeur de votre carte graphique ne dépasse pas 143 mm.
Sans cage pour disque dur : Longueur maximale = 318 mm
Avec cage pour disque dur : Longueur maximale = 200 mm
Longueur maximale = 482 mm (sans radiateur latéral)
Tableau de compatibilité des radiateurse
Épaisseur maximale (combinaison ventilateur + radiateur)
Côté : <176mm
Côté : <176mm
Côté : <176mm
Côté : <176mm
Côté : <176mm
Côté : <176mm
Côté : <176mm
Côté : <176mm
Côté : <176mm
Côté : <176mm
Côté : <176mm
Côté : <176mm
Côté : <176mm
Côté : <83 mm (radiateur max. 56 mm)
Côté : <176mm
Côté : <65 mm (radiateur max. 38 mm)
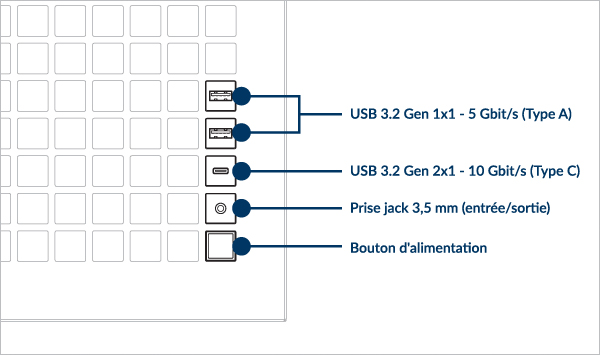
Spécifications du panneau E/S avant
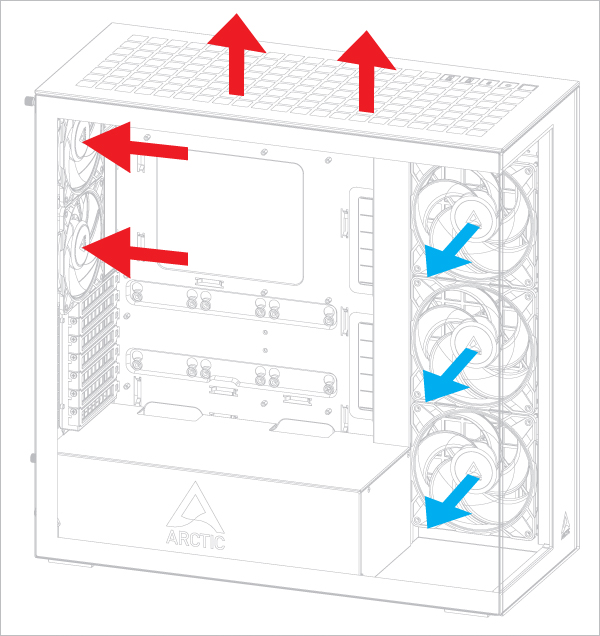
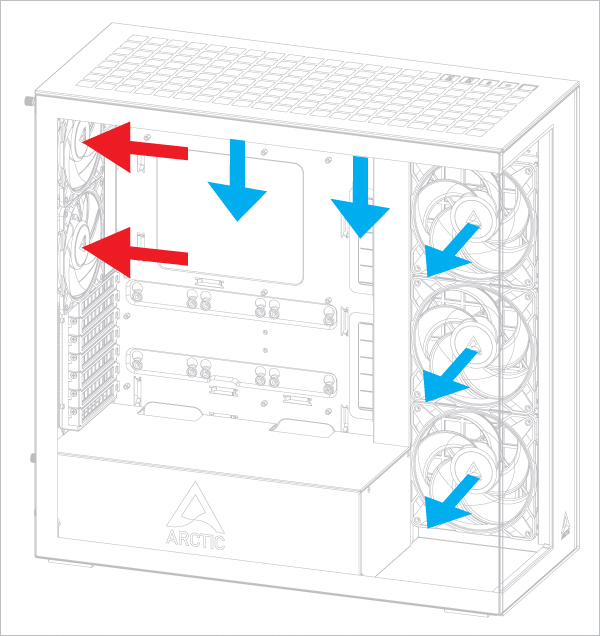
Sens du flux d'air recommandé
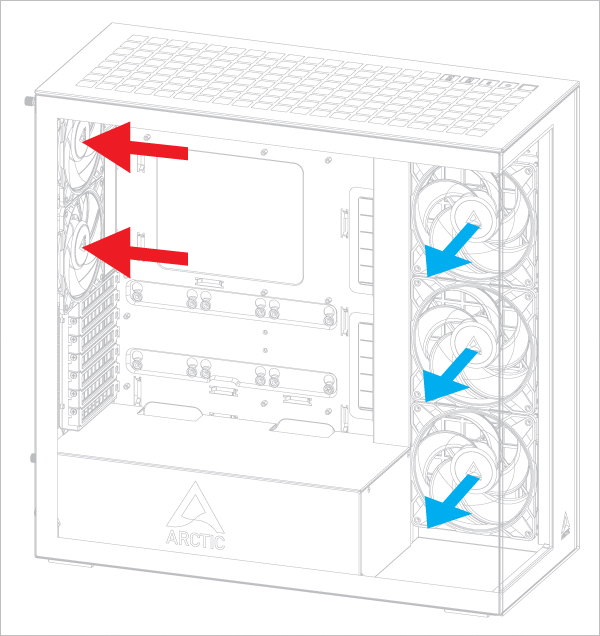
Sens du flux d'air des ventilateurs supérieurs
Cette configuration favorise légèrement la température de la carte graphique.
Cette configuration favorise légèrement la température du processeur.
Retrait du panneau


Installation du bloc d'alimentation


Important ! Installez le bloc d'alimentation avec le ventilateur orienté vers le bas.
Retirer le support du disque dur libérera de l'espace pour le bloc d'alimentation ou le système de gestion des câbles (en option).
Installation de la carte mère
Pour vérifier la compatibilité de votre carte mère, veuillez suivre ce lien.
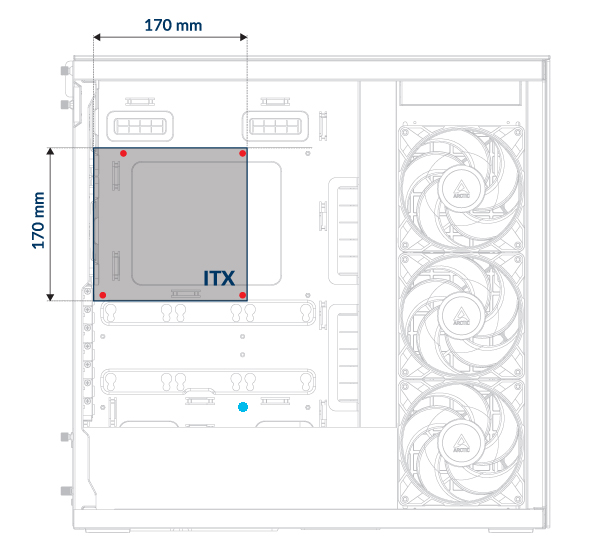
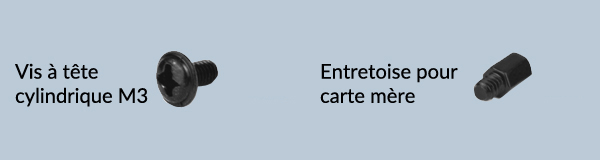
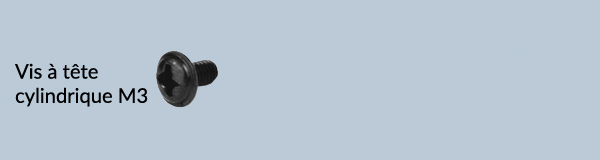
L'installation d'une carte mère Mini-ITX nécessite quatre vis à tête cylindrique M3.
Laissez le trou de vis marqué d'un point bleu vide : il est réservé à l'installation du kit de montage vertical pour GPU.

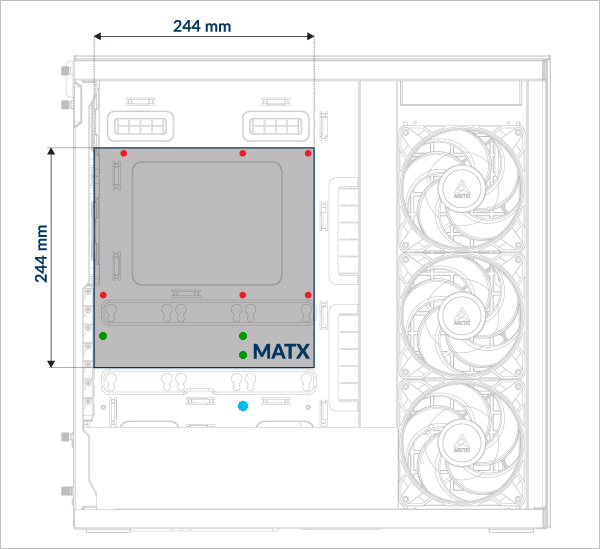
Pour les cartes mères mATX, veillez à installer l'entretoise supplémentaire sur le plateau de la carte mère. Fixez la carte mère avec des vis à tête fraisée M3.
Laissez le trou de vis marqué d'un point bleu vide : il est réservé à l'installation du kit de montage vertical pour GPU.
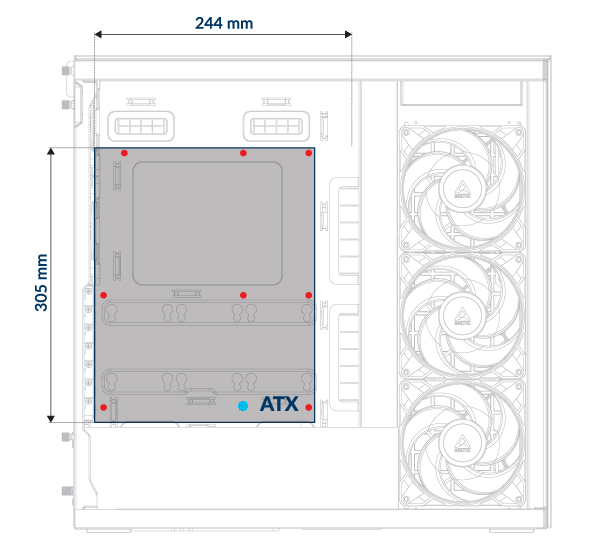
Utilisez des vis à tête fraisée M3 pour installer les cartes mères ATX. Le nombre de vis nécessaires peut varier selon le modèle de carte mère.
Laissez le trou de vis marqué d'un point bleu vide : il est réservé à l'installation du kit de montage vertical pour GPU.

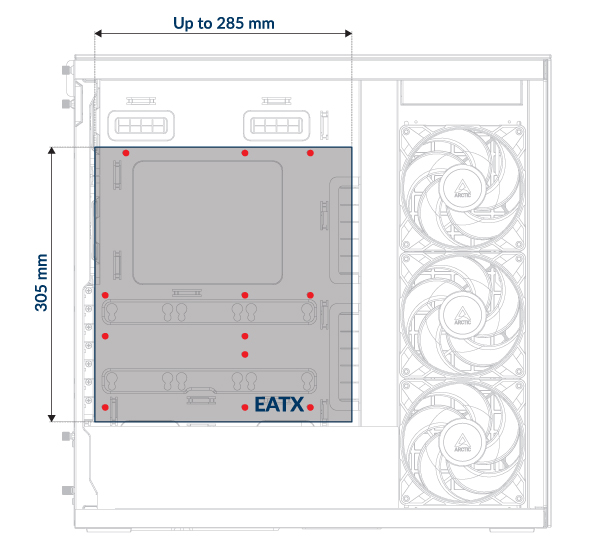
Utilisez des vis à tête fraisée M3 pour installer les cartes mères E-ATX. Le nombre de vis nécessaires peut varier selon le modèle de carte mère.
Laissez le trou de vis marqué d'un point bleu vide : il est réservé à l'installation du kit de montage vertical pour GPU.
Retirez le kit de montage vertical pour GPU avant d'installer la carte mère.
Le blindage E/S doit être installé avant la carte mère.
Le blindage E/S est fourni en accessoire avec la carte mère.
Certaines cartes mères peuvent en être équipées.
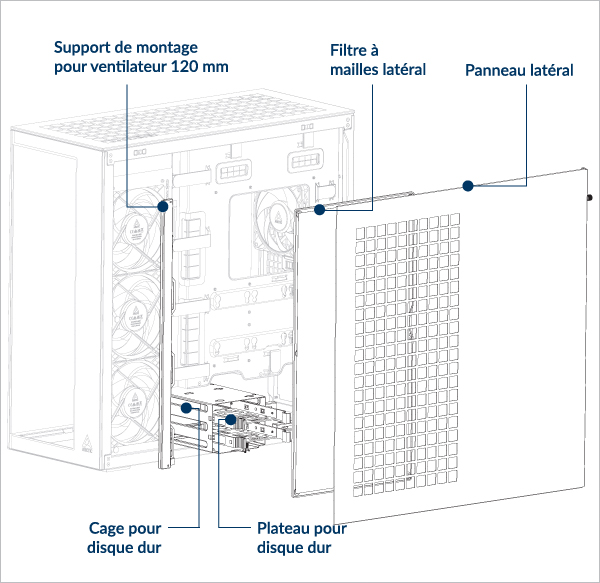
Installation du SSD et du disque dur
Emplacement du SSD et du disque dur
Prend en charge jusqu'à 6 SSD 2,5" ou 4 SSD 2,5" + 2 disques durs 3,5"
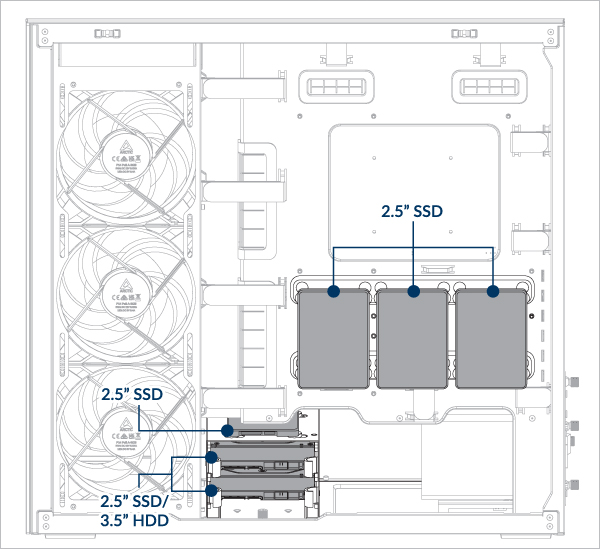
- Installation d'un SSD sur le plateau de la carte mère
- Installation d'un SSD dans le plateau du disque dur
- Installation d'un disque dur
- nstallation d'un SSD sur le plateau du disque dur


Alignez les ergots du plateau de disque dur avec les trous du disque dur.

Alignez les amortisseurs du SSD avec les trous de fixation du plateau du disque dur.
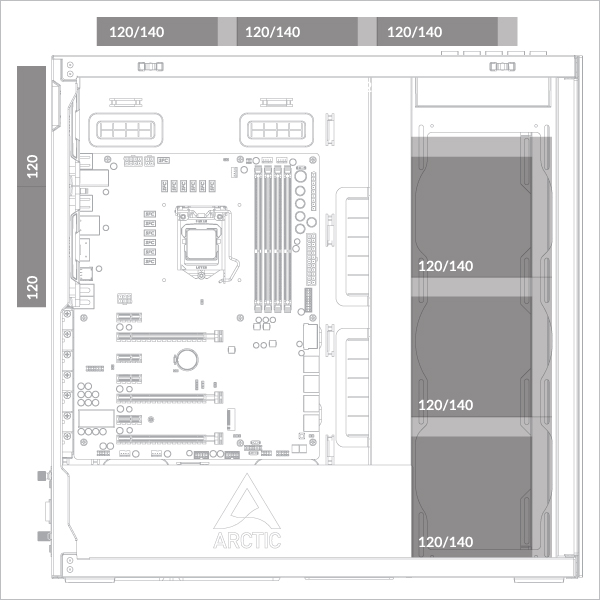
Installation du ventilateur/radiateur
Support de ventilateur
Prend en charge jusqu'à 3 ventilateurs de 120 ou 140 mm sur le dessus et le côté..
Prend en charge 2 ventilateurs de 120 mm à l'arrière.
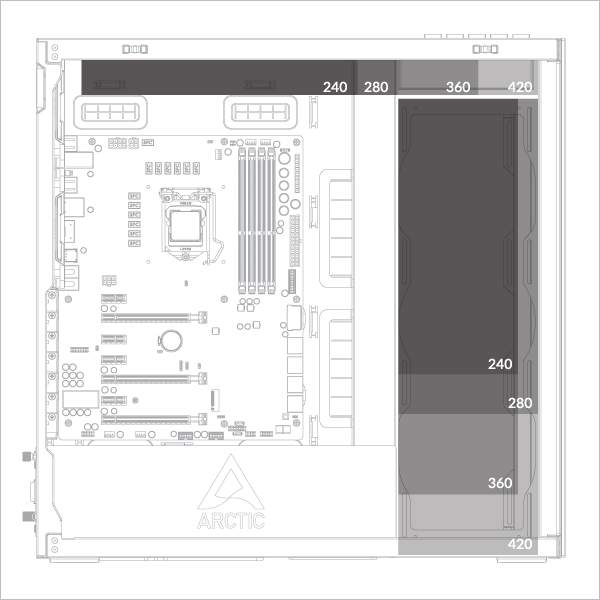
Support de radiateur
Épaisseur maximale (combinaison ventilateur + radiateur)
Côté : <176mm
Côté : <176mm
Côté : <176mm
Côté : <176mm
Côté : <176mm
Côté : <176mm
Côté : <176mm
Côté : <176mm
Côté : <176mm
Côté : <176mm
Côté : <176mm
Côté : <176mm
Côté : <176mm
Côté : <83 mm (radiateur max. 56 mm)
Côté : <176mm
Côté : < 65 mm (radiateur max. 38 mm)
Pour vérifier la compatibilité de votre carte graphique, veuillez suivre ce lien.
- 360/240 mm sur le panneau supérieur
- 360/240 mm sur le panneau latéral
- 420/280 mm sur le panneau supérieur
- 420/280 mm sur le panneau latéral
Installation du radiateur
Si vous utilisez un refroidisseur liquide ARCTIC, veuillez consulter cette page pour obtenir des conseils d'installation supplémentaires : [Refroidisseurs à eau ARCTIC AIO – Manuel d'utilisation]
Retirez les ventilateurs avant d'installer le radiateur sur le panneau latéral.

Fixez le support de montage du ventilateur avant d’installer un radiateur de 240 mm ou 360 mm.
Si vous utilisez un refroidisseur liquide ARCTIC, veuillez consulter cette page pour obtenir des conseils d'installation supplémentaires : [Refroidisseurs à eau ARCTIC AIO – Manuel d'utilisation]
Retirez le support de fixation du ventilateur avant d'installer un radiateur de 280 ou 420 mm.
Si vous utilisez un refroidisseur liquide ARCTIC, veuillez consulter cette page pour obtenir des conseils d'installation supplémentaires : [Refroidisseurs à eau ARCTIC AIO – Manuel d'utilisation]
Retirez les ventilateurs avant d'installer le radiateur sur le panneau latéral.
Si vous utilisez un refroidisseur liquide ARCTIC, veuillez consulter cette page pour obtenir des conseils d'installation supplémentaires : [Refroidisseurs à eau ARCTIC AIO – Manuel d'utilisation]
Connexion des câbles
E/S avant et bouton d'alimentation
Connectez les câbles aux connecteurs appropriés de la carte mère.
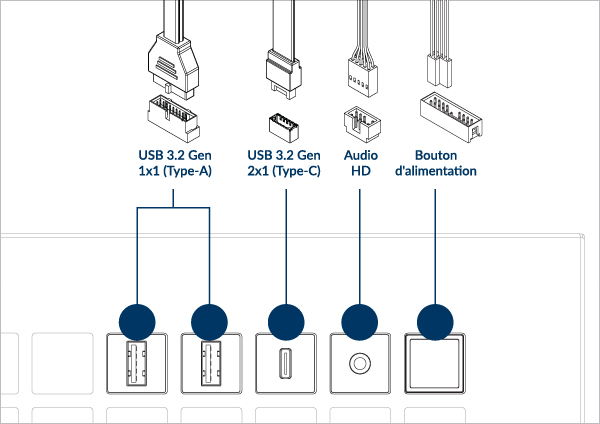
Consultez le manuel de votre carte mère pour connaître le connecteur et la position des broches.
Connexion du câble du ventilateur
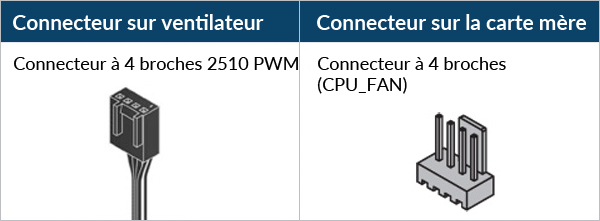
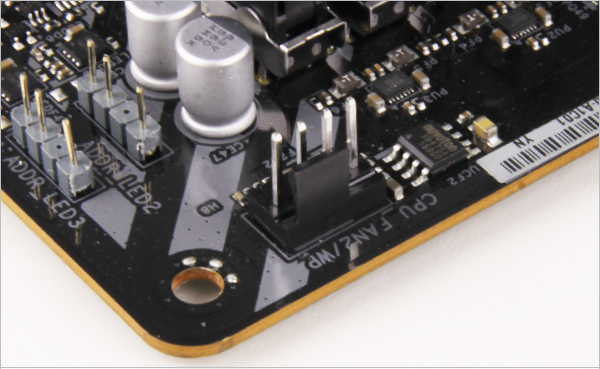
Si votre carte mère ne dispose pas de suffisamment de connecteurs pour ventilateurs, nous vous recommandons d'utiliser le concentrateur de ventilateurs ARCTIC.
Pour optimiser vos ventilateurs, il est recommandé d'ajuster la vitesse du ventilateur dans le BIOS. Suivez ce guide pour ajuster votre PWM.


Ne connectez pas plus de 5 ventilateurs/bandes à un en-tête
Pour profiter pleinement de vos produits A-RGB, consultez le guide d'installation A-RGB.
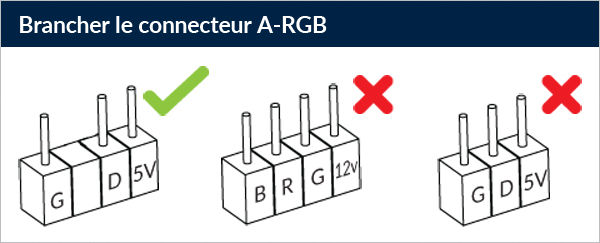
Connexion du câble de bande RVB du bloc d'alimentation
Trouvez les câbles RVB du bloc d'alimentation dans le compartiment du bloc d'alimentation.
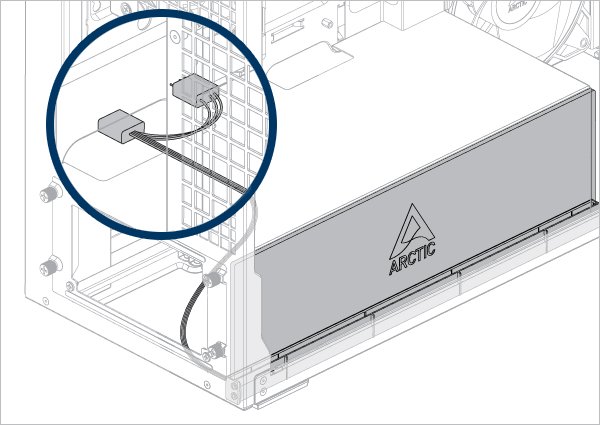
Connectez-le au connecteur A-RGB à 3 broches de la carte mère.

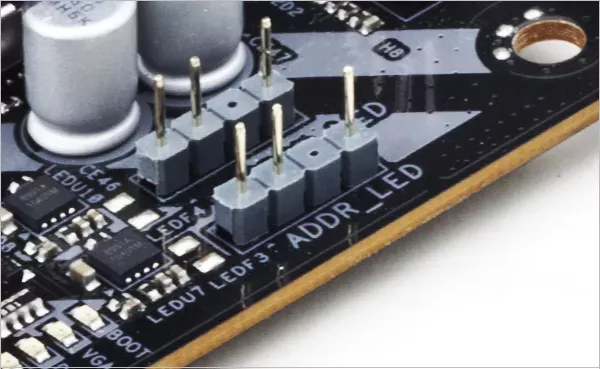

Ne connectez pas plus de 5 ventilateurs/bandes à un en-tête
Pour profiter pleinement de vos produits A-RGB, consultez le guide d'installation A-RGB.
Installation d'une carte graphique ou d'une carte d'extension
Installation du kit de montage vertical pour GPU
Certaines cartes graphiques sont équipées d'un système de refroidissement surdimensionné, dont les dimensions dépassent largement celles définies par la spécification PCIe. Lors de l'installation de cette carte dans le support vertical, elle empiète sur l'espace réservé au refroidissement du processeur et peut, dans certains cas, engendrer des interférences mécaniques.
Facultatif : Déverrouillez les vis et les entretoises pour ajuster la position du câble riser et de la carte graphique.
Utilisez l’outil de démontage des entretoises pour les déverrouiller et les installer.


Important ! Assurez-vous que le câble est bien inséré dans le slot. Nous recommandons d'utiliser le premier slot PCIe pour des performances optimales.
Atención
Déverrouillez complètement le loquet avant d'installer la carte graphique.
Installation de la carte graphique


Faites glisser le loquet vers l'arrière pour verrouiller la carte graphique.
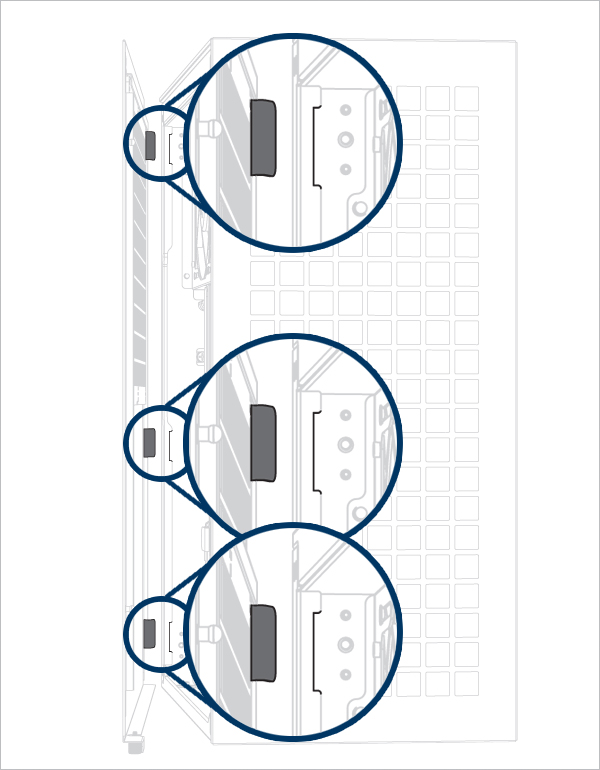
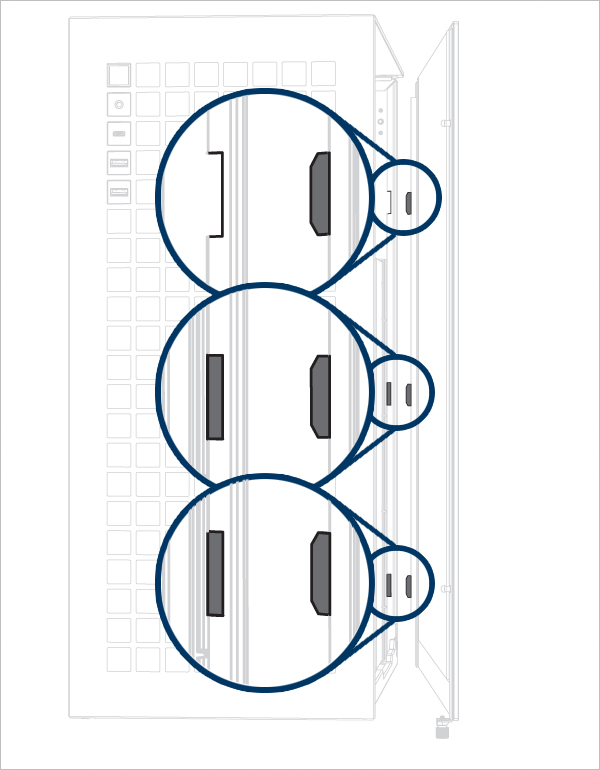
Installation du panneau
- Panneau supérieur
- Panneau latéral
- Panneau latéral en verre
- Panneau avant en verre
Installation du panneau
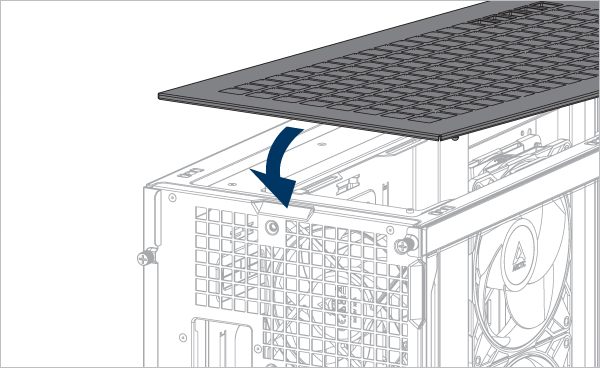
Alignez les languettes du panneau latéral avec les encoches du panneau inférieur.
Alignez les languettes du panneau latéral en verre avec l'encoche du panneau inférieur.
Produits Recommandés


