How to do your fan PWM settings properly.
Step 1: Identify your Fan Type by the Fan Connector
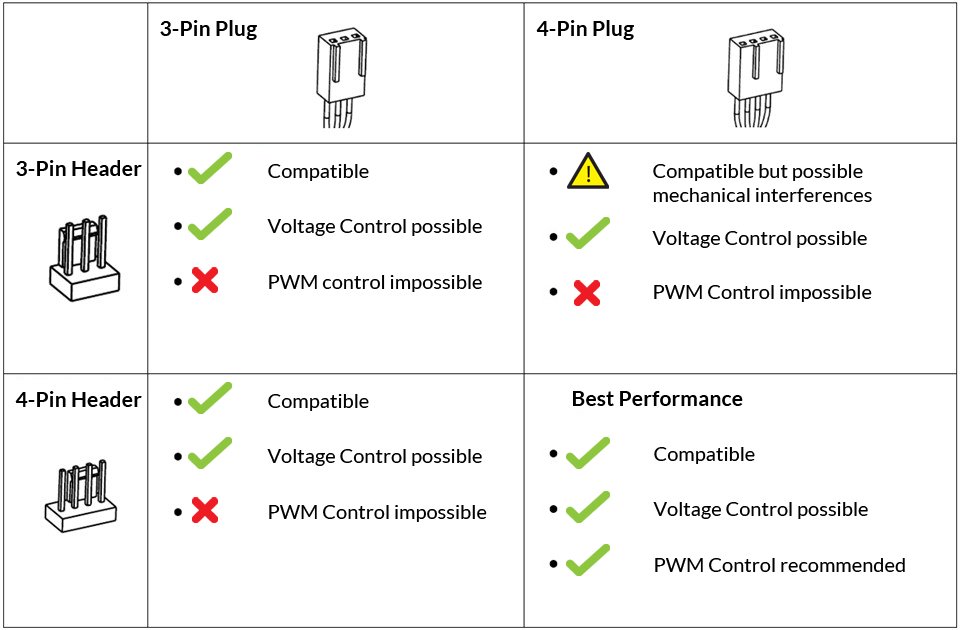
3-Pin fans are usually fixed-speed fans, they can however be voltage controlled when the motherboard allows it. Voltage control typically provides lower efficiency than the PWM control, minimum speeds are also not as low as with PWM control.

4-Pins fans can be speed regulated by PWM. This allows a finer control of the fan and allows to reach lower speed for silent operation.

3-Pin and 4-Pin are cross compatible but with some limitations as illustrated in below table.
Step 2: Insert the Fan Connectors into Motherboard
Plug different fans into the corresponding header. Such as, plug the CPU fan to the CPU_FAN header, plug the case fans to the chassis headers (SYS_FAN/ CHA_FAN)
CPU_OPT header is for second fan of you CPU cooler.
The names of the fan headers will be printed on the motherboard. (please refer to your motherboard manual).
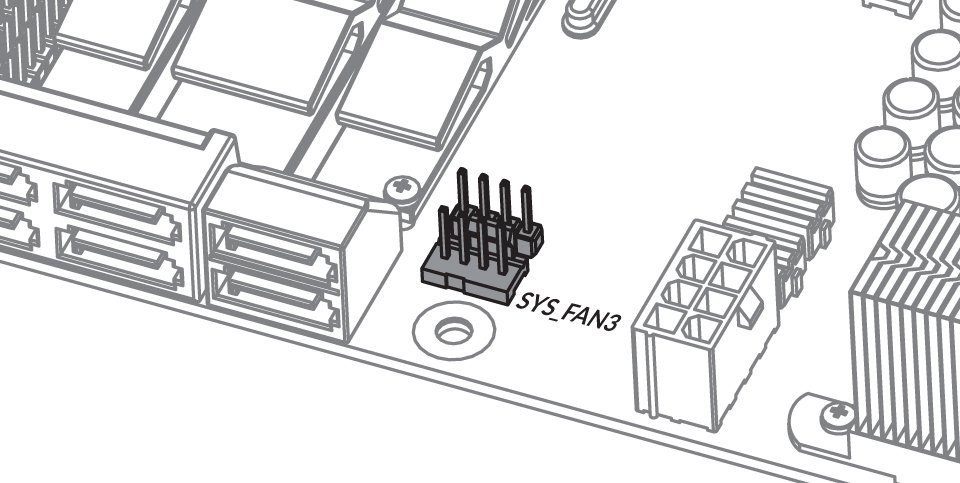
Ensure the fan cable is fully inserted into the header.

If your motherboard doesn’t have enough fan headers, please try our PWM Sharing cable or PWM Fan Hub or PST fans
Step 3: Set the Fan Curve.
Option 1: Fan setting in BIOS
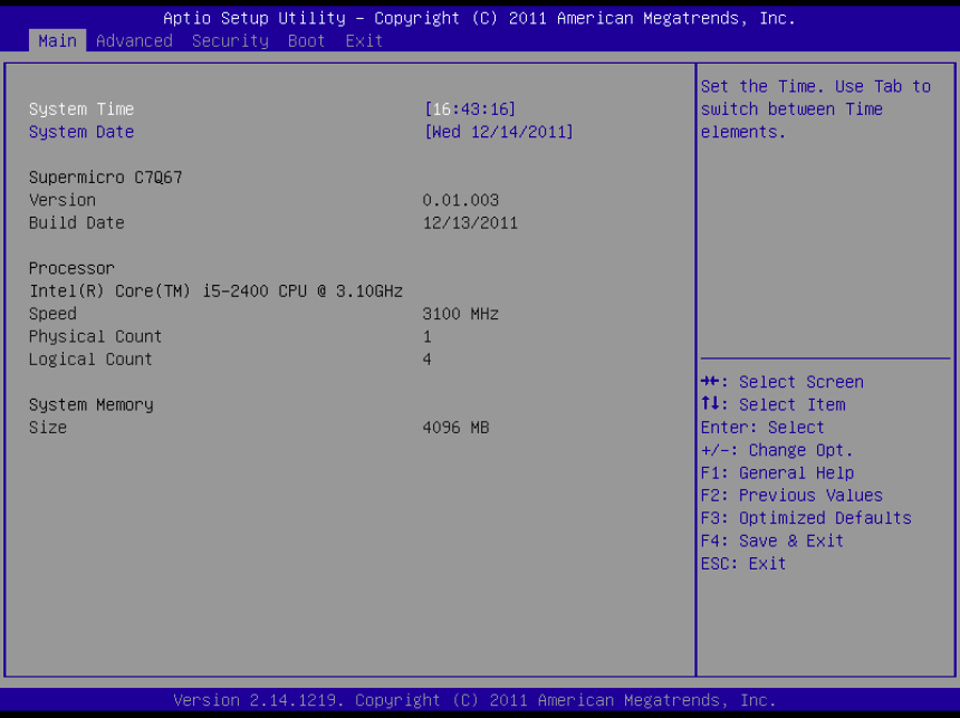
- Enter the BIOS
- Turn off your PC
- Hold F2 button
- Press power button to enter BIOS
Please refer to this video if you cannot press F2 to enter the BIOS.
Windows 10 How to enter BIOS configuration
- Select Q-Fan control or press F6
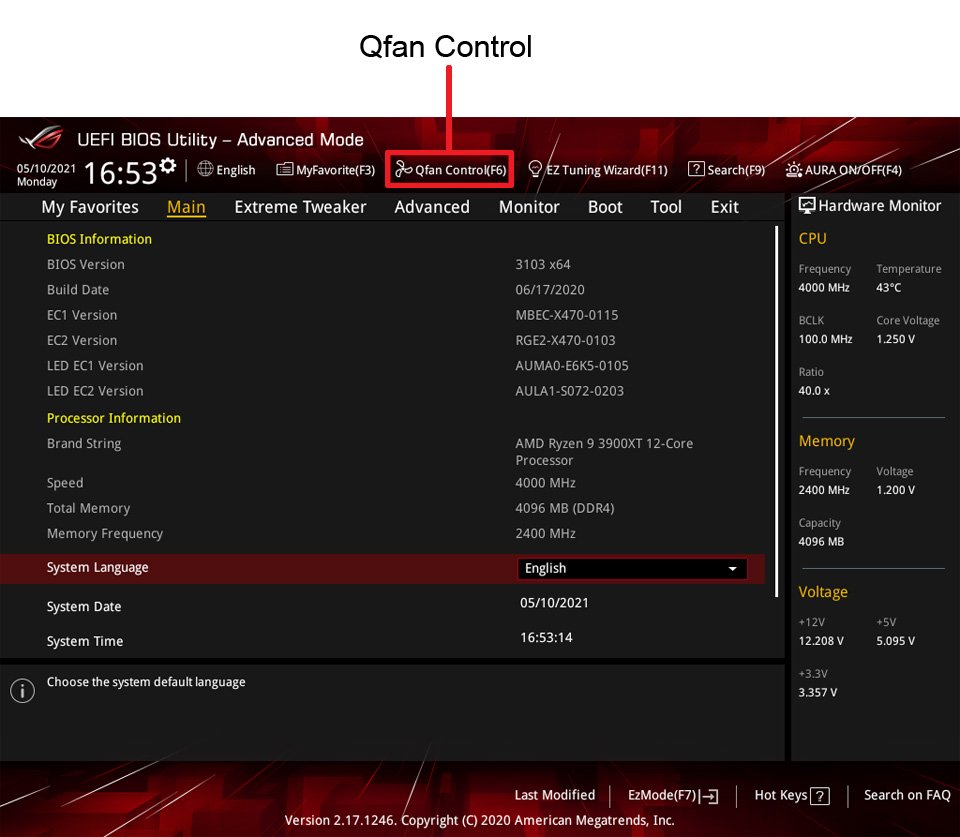
- The Q-Fan control allows you to set a fan profile or manually configure the operating speed of your CPU and chassis fans

- Select the fan that you want to configure
- Select DC or PWM control according to your fan type.
- Click and drag the speed points to adjust the fan’s operating speed
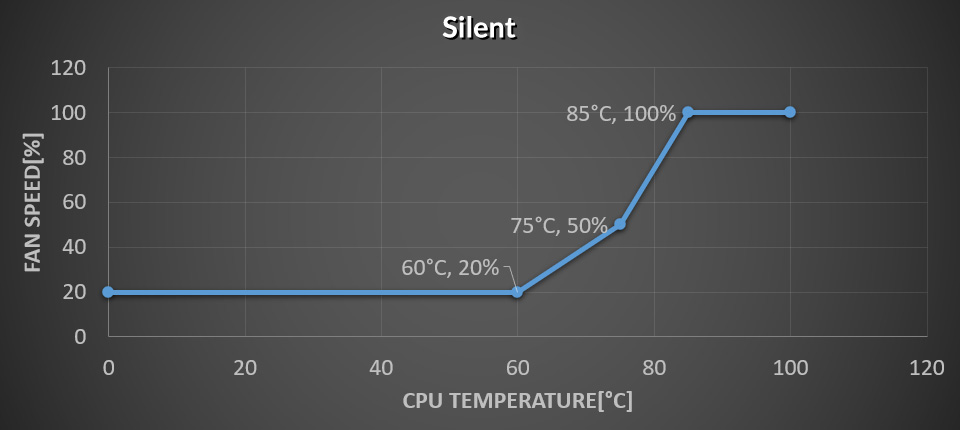
Recommended fan curve:
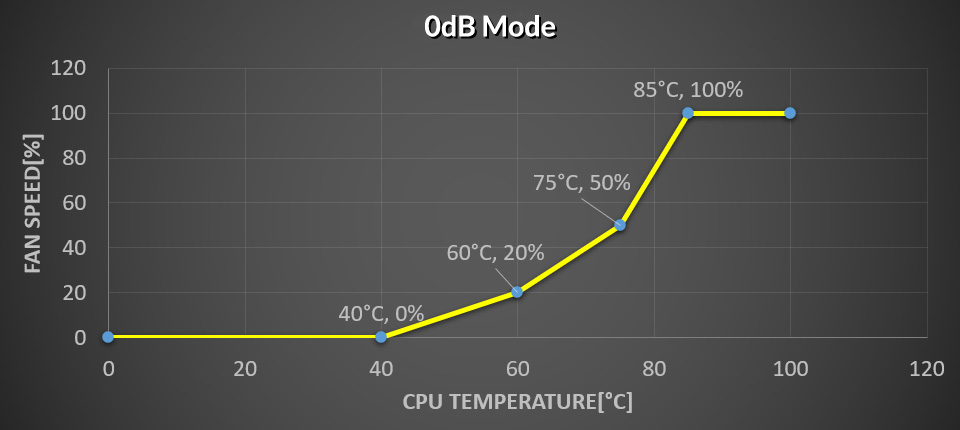
minimum speed to 60°C, first slope to 50%PWM @75°C, then steep slope to 100% PWM @85°C
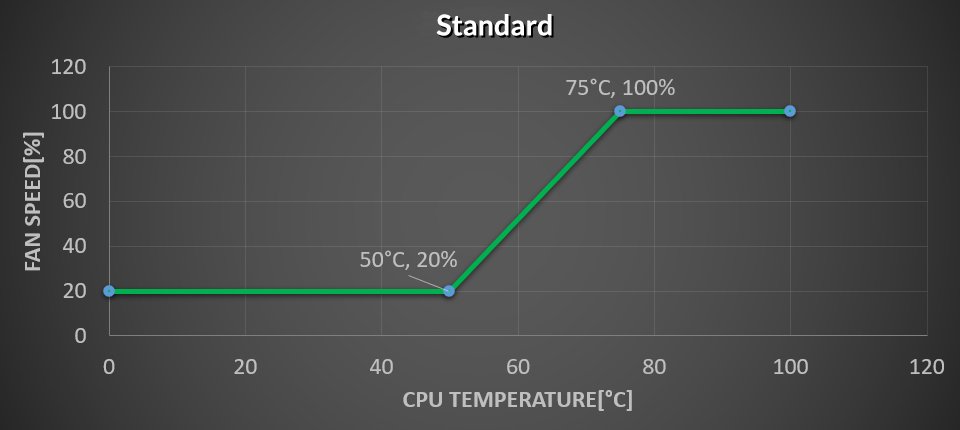
minimum speed to 50°C, then slope to 100% PWM @75°C
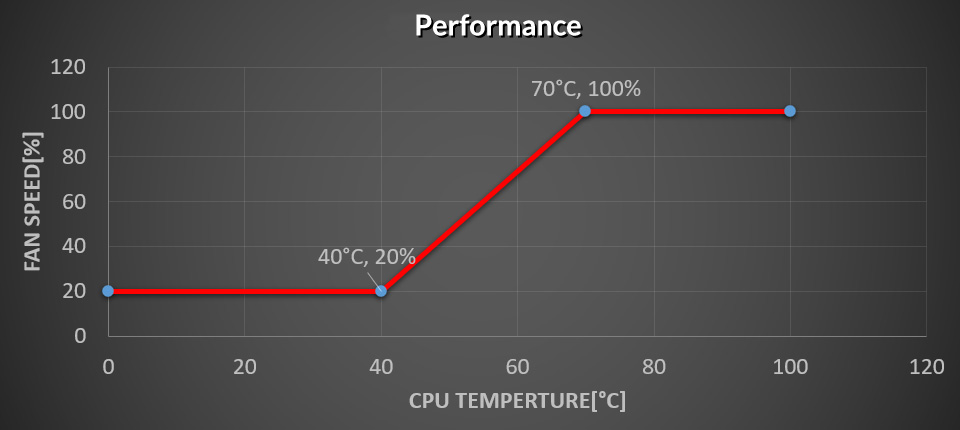
minimum speed to 40°C, then slope to 100% PWM @70°C
For fans with 0dB function, set the minimum speed to 0% to enable 0dB mode.
- Click Apply to save the changes then click Exit(ESC)
- Press F10 to save settings and restart your PC
PS. Please refer to your motherboard user guide to get the accurate details. The pictures in this section are for reference only and may vary from the motherboard you purchased
Option 2: Set the Fan Curve by ASUS Fan Xpert
Please refer to this website to get the latest details Fan Xpert 4 - Introduction
PS. The software support may vary from the motherboard you have.
Install Fan Xpert
Option 1: From Asus Website
- Go to your product support website ASUS motherboard
- Click Support

- Click Driver & Tools

- Select your OS version

- Find Asus AI Suite

- Download and install
Option 2: From Support Media
Find your Support Media and install the ASUS utilities
Set up your Fan Curve
Set your fan according to the link below
Fan Xpert 4 - Introduction
Set your fan according to the link below
Fan Xpert 4 - Introduction
Option 1: Fan setting in BIOS
- Enter the BIOS
- Turn off your PC
- Hold Del or F2
- Press power button to enter BIOS
Please refer to this video if you cannot press F2 or Del to enter the BIOS. Windows 10 How to enter BIOS configuration

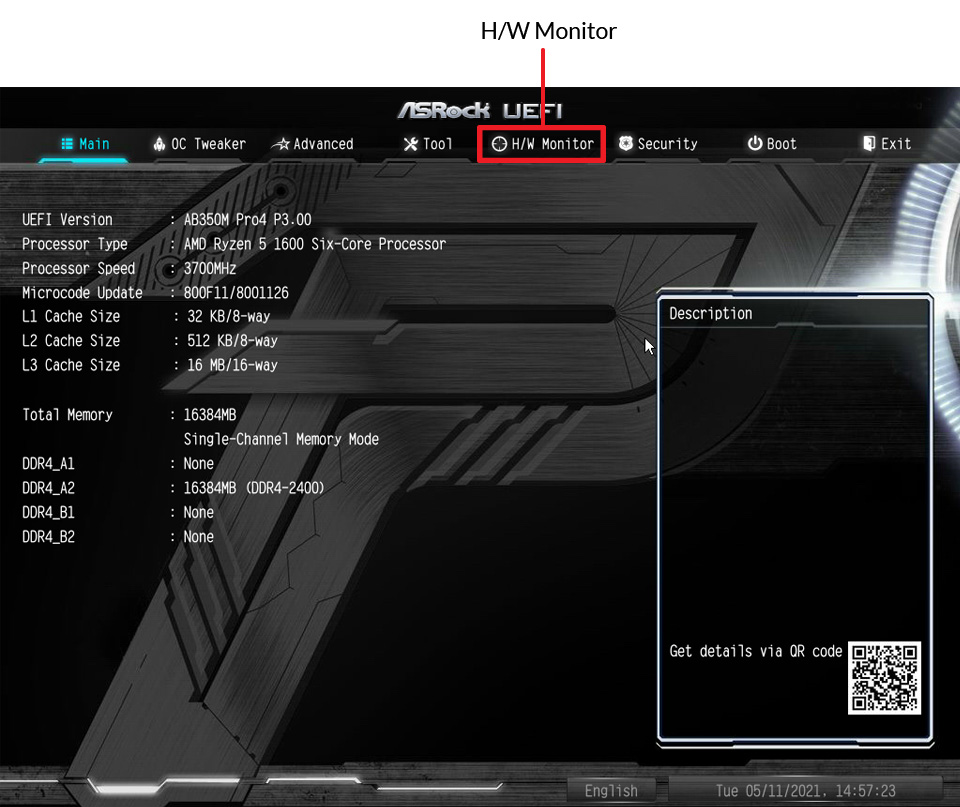
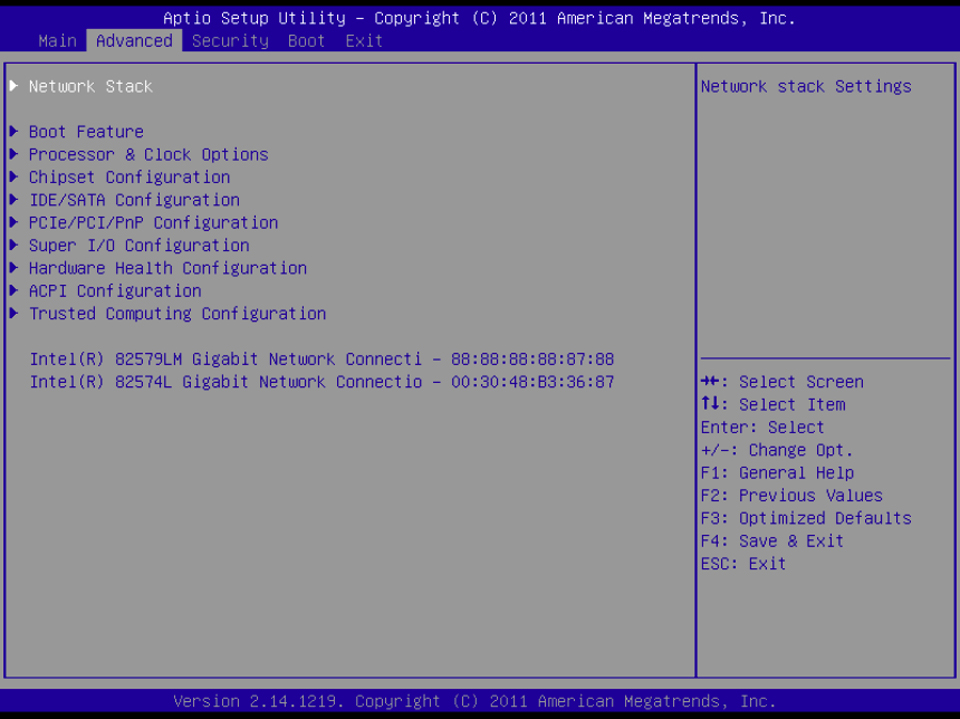
- Select Hardware Monitor
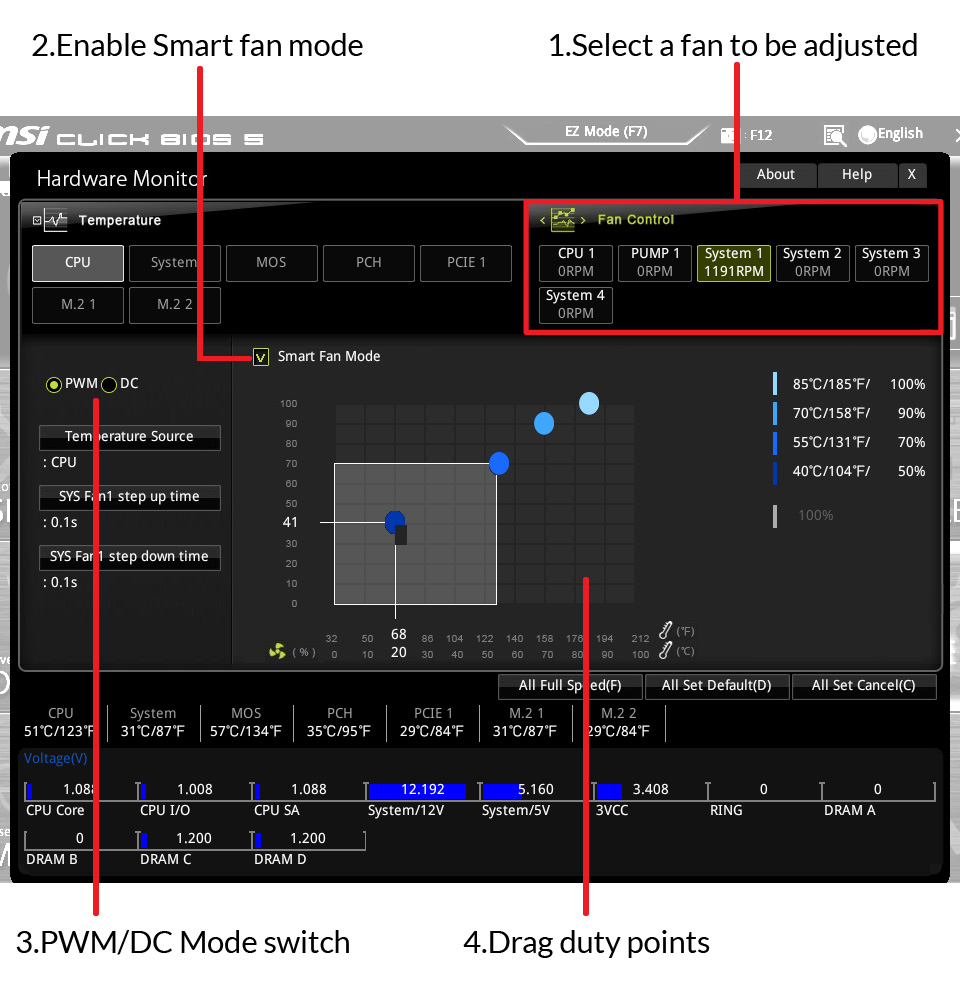
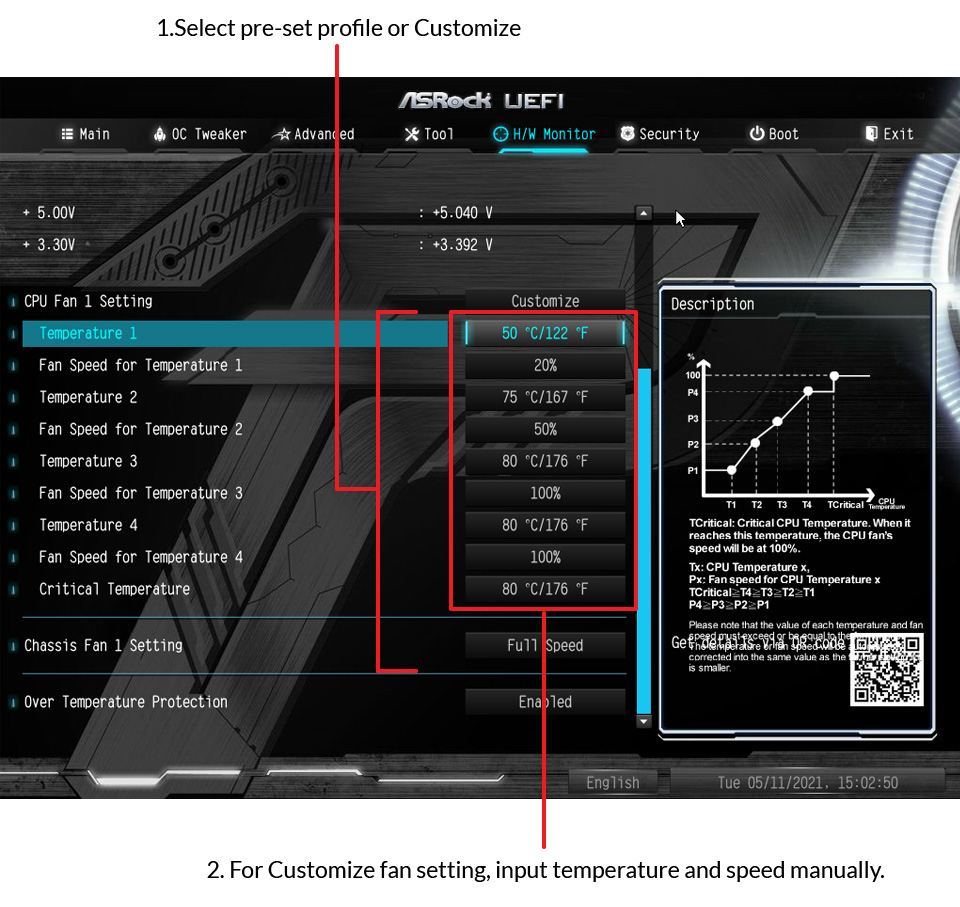
- Select the Fan that you want to adjust and to display the fan duty curve line in fan operating windows.
- Select DC or PWM control according to your fan type.
- Click and drag the duty points to adjust the fan speed.
Recommended fan curve:
minimum speed to 60°C, first slope to 50%PWM @75°C, then steep slope to 100% PWM @85°C
minimum speed to 50°C, then slope to 100% PWM @75°C
minimum speed to 40°C, then slope to 100% PWM @70°C
For fans with 0dB function, set the minimum speed to 0% to enable 0dB mode.
- Press F10 to save and restart your PC.
PS. Please refer to your motherboard user guide to get the accurate details. The pictures in this section are for reference only and may vary from the motherboard you purchased
Option 2: Fan Setting in MSI Utility
Please refer to MSI website to get the latest details MSI Utility manual.
- Enter the BIOS
- Turn off your PC
- Hold Del or F2
- Press power button to enter BIOS
Please refer to this video if you cannot press F2 or Del to enter the BIOS.
Windows 10 How to enter BIOS configuration
- Select H/W Monitor
- Select CPU1_FAN Setting / CPU2_FAN Setting/ CHA_FAN1 Setting etc. to configure the fan setting as you want.
Recommended fan curve:
minimum speed to 60°C, first slope to 50%PWM @75°C, then steep slope to 100% PWM @85°C
minimum speed to 50°C, then slope to 100% PWM @75°C
minimum speed to 40°C, then slope to 100% PWM @70°C
For fans with 0dB function, set the minimum speed to 0% to enable 0dB mode.
- Press F10 or Esc to save and restart your PC
PS. Please refer to your motherboard user guide to get the accurate details. The pictures in this section are for reference only and may vary from the motherboard you purchased
Option 1: Fan Setting in BIOS
- Enter the BIOS
- Turn off your PC
- Hold Del or F2
- Press power button to enter BIOS
Please refer to this video if you cannot press F2 or Del to enter the BIOS.
Windows 10 How to enter BIOS configuration
- Press F2 to switch between Easy mode and Advanced mode. Select Easy mode.
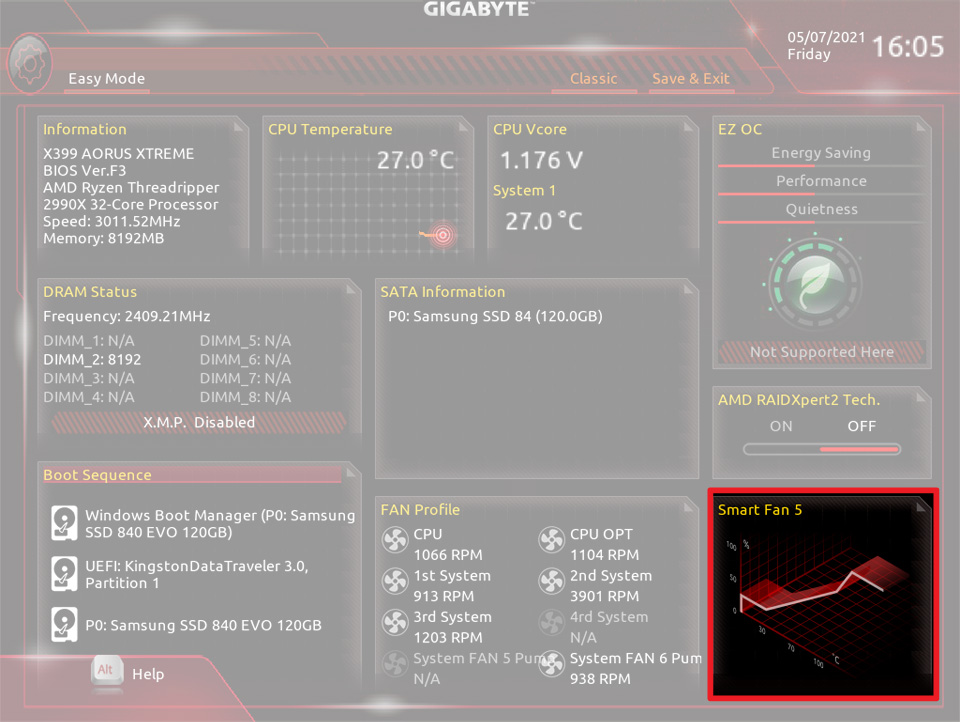
- Select Smart Fan 5
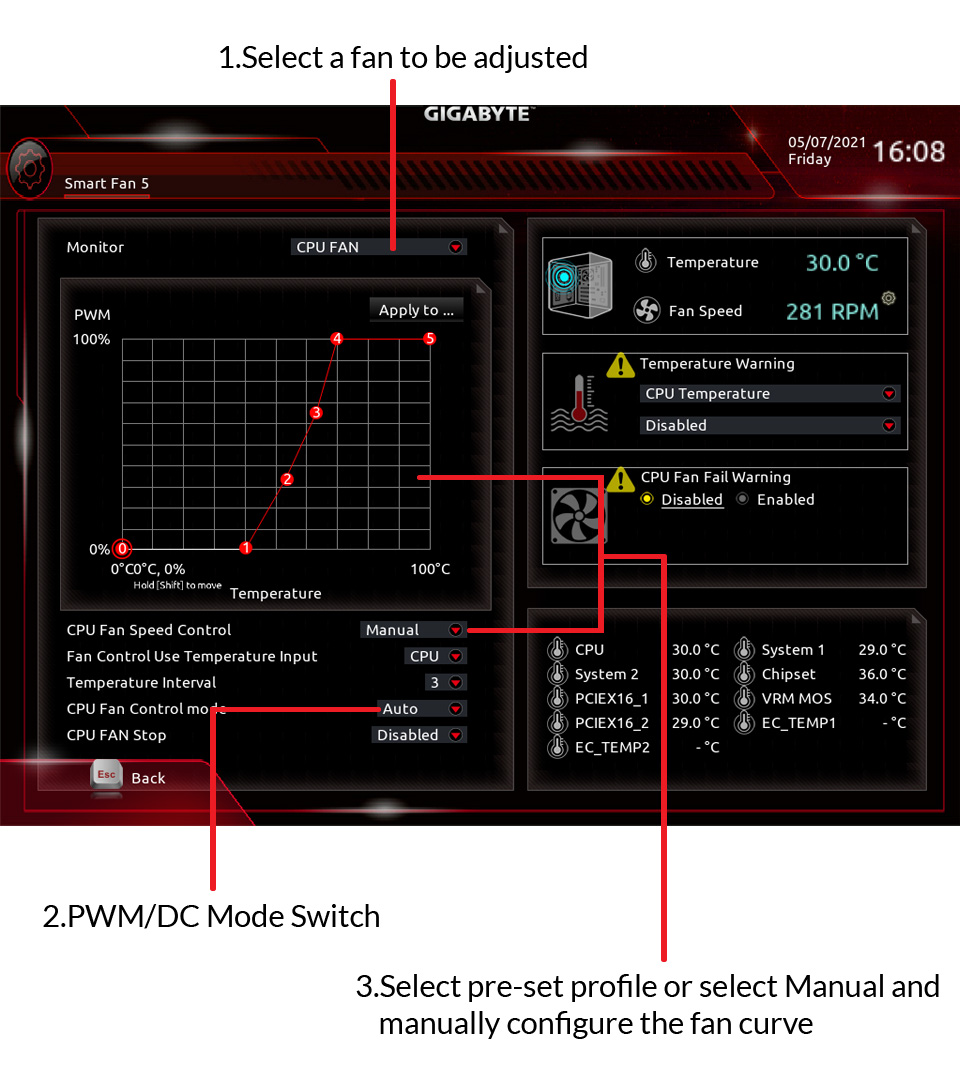
- Select the Fan that you want to adjust and to display the fan duty curve line in fan operation
- Select DC or PWM control according to your fan type.
- Click and drag the duty points to adjust the fan speed.
Recommended fan curve:
minimum speed to 60°C, first slope to 50%PWM @75°C, then steep slope to 100% PWM @85°C
minimum speed to 50°C, then slope to 100% PWM @75°C
minimum speed to 40°C, then slope to 100% PWM @70°C
For fans with 0dB function, set the minimum speed to 0% to enable 0dB mode.
- Press F10 to save and restart your PC.
PS. Please refer to your motherboard user guide to get the accurate details. The pictures in this section are for reference only and may vary from the motherboard you purchased
Option 2: Fan Setting in Gigabyte Utility
Please refer to this website to get the latest details Gigabyte system information viewer
Install Gigabyte Utility
Option 1: From Gigabyte Website
- Go to your product support website Gigabyte motherboard
- Select your motherboard
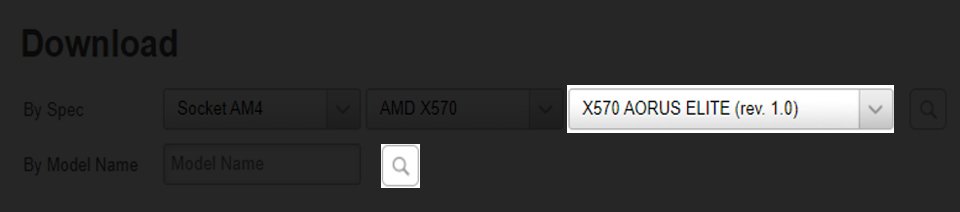
- Select your OS version

- Download and Install APP Center and System information viewer


Option 2: From Support Media
Find your Support Support Media and install the Gigabyte utilities
Set up the Fan Curve
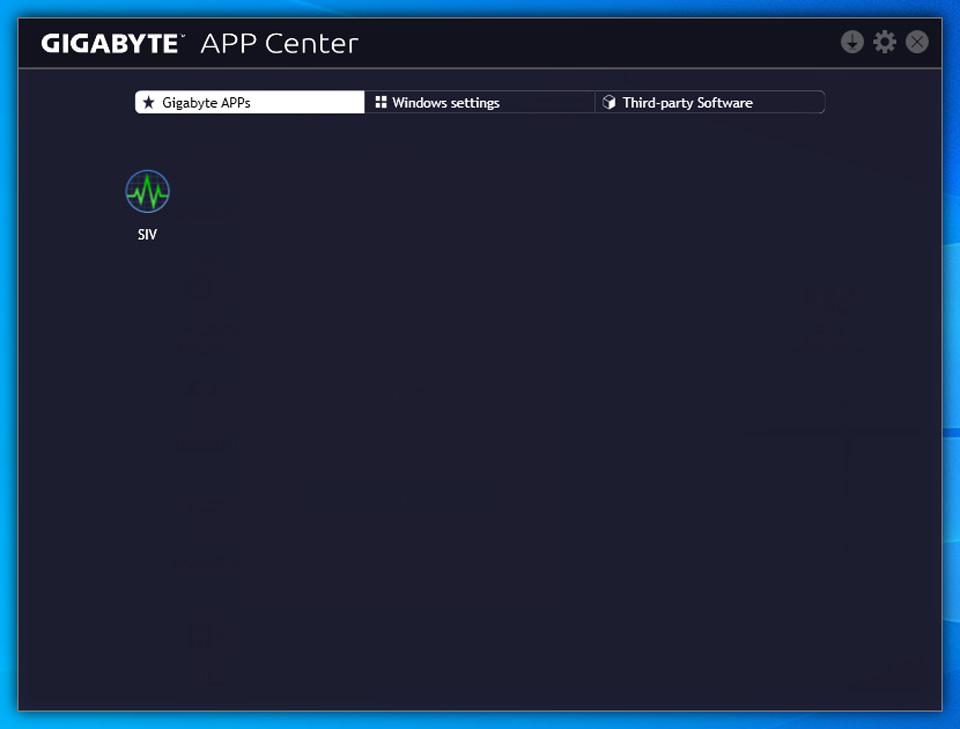
- Open App Center
- Click SIV and Select Smart Fan 5 Advanced
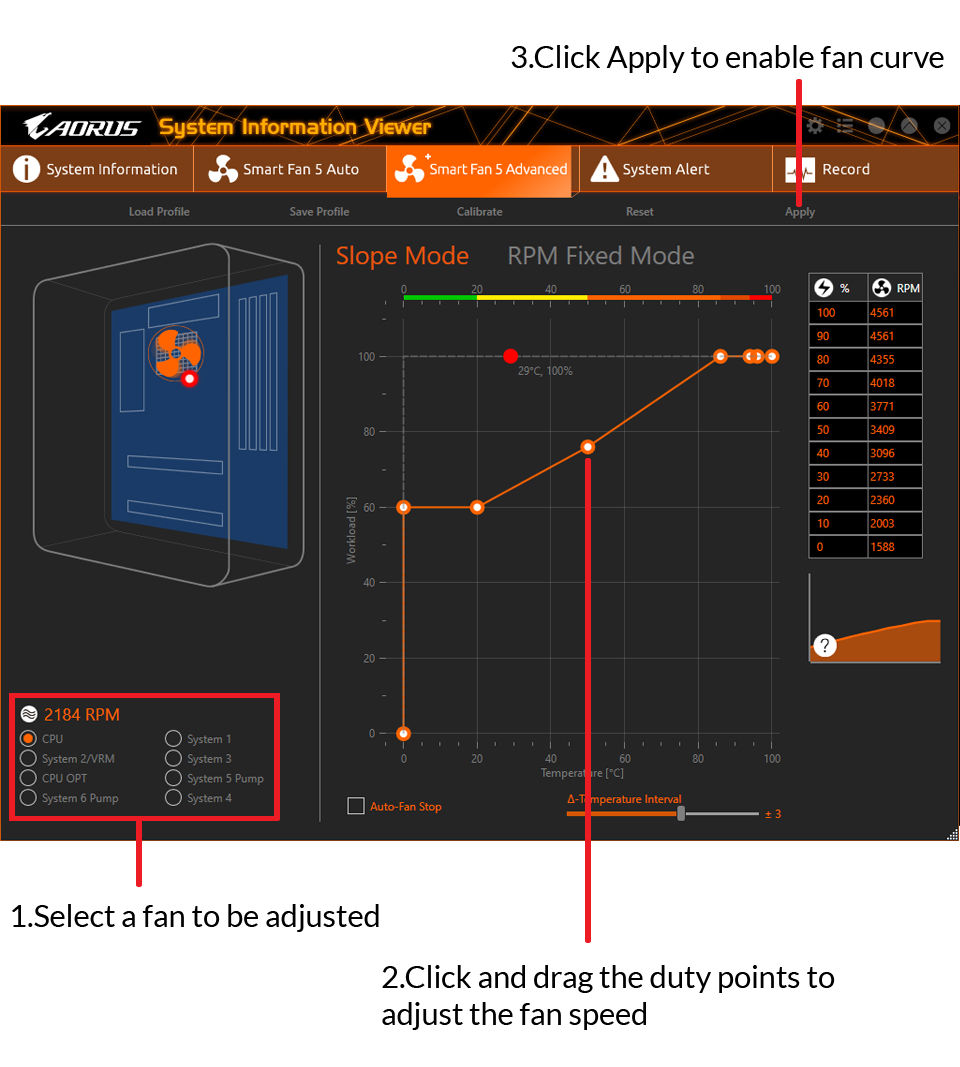
- Select the Fan that you want to configure
- Click and drag the duty points to adjust the fan speed.
- Click “Apply”
- Enter the BIOS
- Turn off your PC
- Hold Del button
- Press power button to enter BIOS
Please refer to this video if you cannot press F2 or Del to enter the BIOS.
Windows 10 How to enter BIOS configuration
- Press ← → to Select Advanced option
- Press ↑↓ to select Hardware Health Configuration/ Smart FAN configuration/ CPU Q-Fan Function (refer to your motherboard manual)
- Select the fan that you want to configure
- Configure your fan profile as you want
Recommended fan curve:
minimum speed to 60°C, first slope to 50%PWM @75°C, then steep slope to 100% PWM @85°C
minimum speed to 50°C, then slope to 100% PWM @75°C
minimum speed to 40°C, then slope to 100% PWM @70°C
For fans with 0dB function, set the minimum speed to 0% to enable 0dB mode.
- Press F10 or F4 to save settings and restart your PC (refer to your motherboard manual)
PS. Please refer to your motherboard user guide to get the accurate details. The pictures in this section are for reference only and may vary from the motherboard you purchased.
- Download and Install the Fan Control from the official website.
Link to the Fan Control website, click here
- Download the ARCTIC Recommended Fan Curve Configuration.
Click here to download.
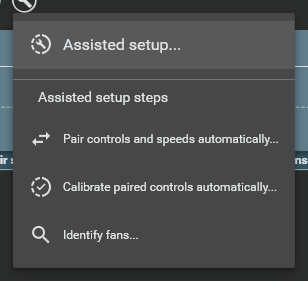
- Start the Fan Control as administrator.
- Run assisted setup.
- Click OK to Start.
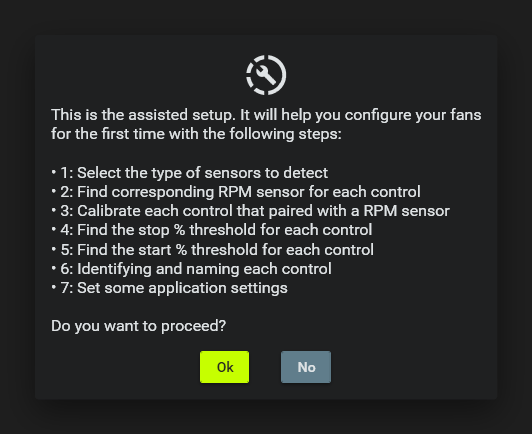
- Keep default setting and Click OK to next.
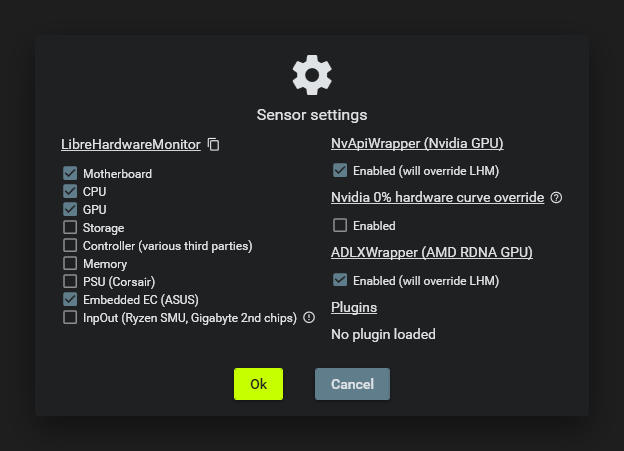
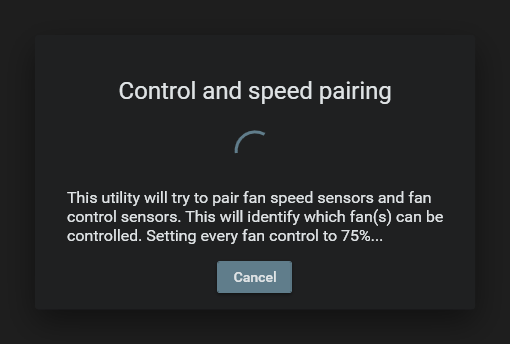
- The software will detect the fans and sensors automatically. This process will take few minutes.
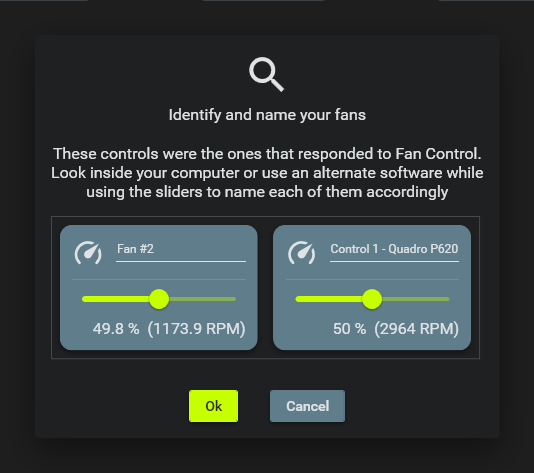
- Rename the Fans and Click Ok to next.
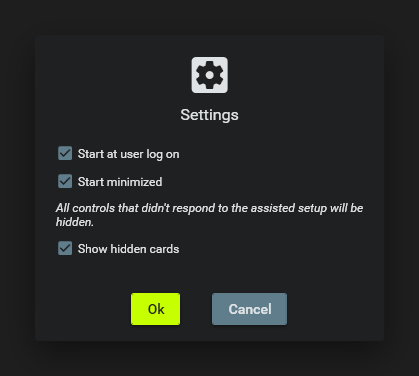
- Select “Start at user log on” and “Start minimized” to enable the Fan Control when the PC start. Click Ok to finalize the setup.
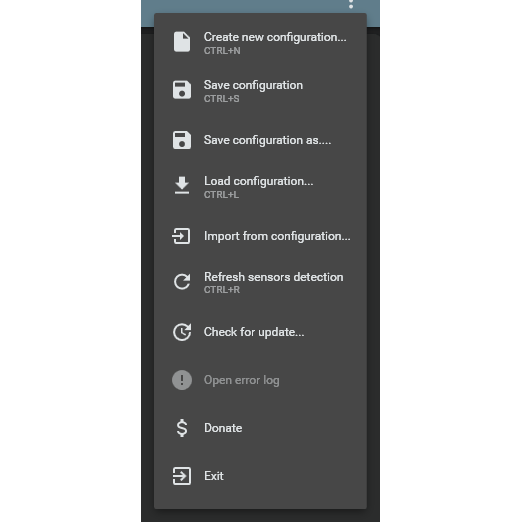
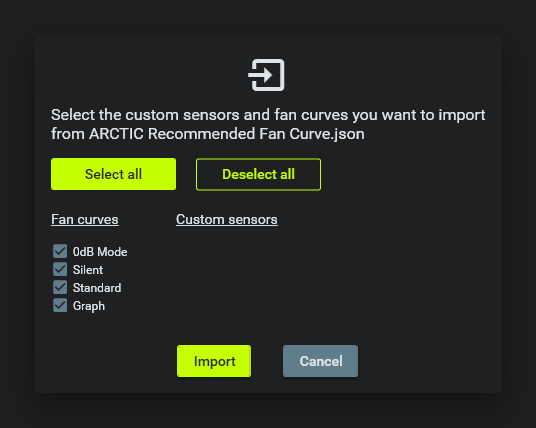
- Click ellipsis icon on upper right corner and select “Import from configuration”
- Select “ARCTIC Recommended Fan Curve.json” and Import Fan Curves
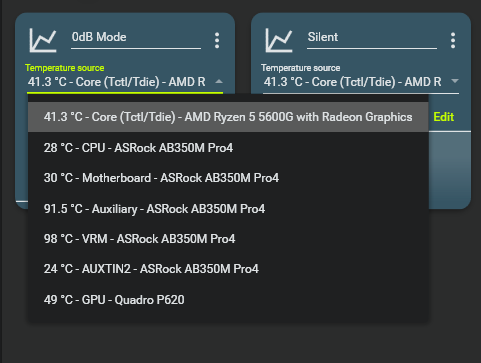
- Select correct temperature source. For example, “Tctl/Tdie”, “CPU Package Temperature” “CPU Temp”, etc.
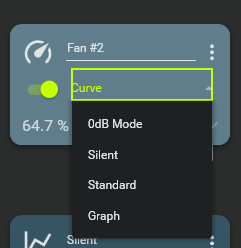
- Click the Green Switch to enable software control. Select the curve you prefer.
- The fan control setup is completed.
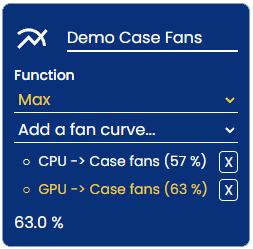
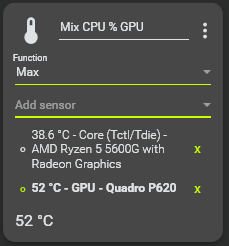
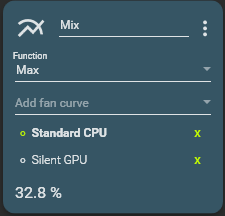
The mix function is an advance feature of the fan control. It combines multiple fan curves and sensors and applies functions like max or average to create advance control logic. Assign different curves to different temperature sensors. Allows you to control the case base on smarter logic.
How to set up the mix sensor:
- Click the “+” Icon at the right corner. Select Mix temperature sensor.
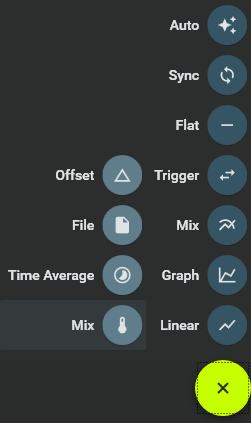
- You can rename the sensor as “Mix CPU&CPU”. Select Max function. Click “Add Sensor” to select multiple sensors.
- Back to the fan curve and assign new sensor to the fan curve.
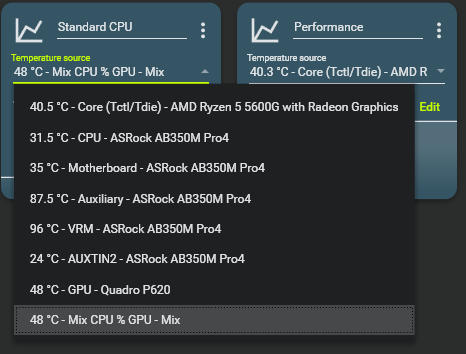
- Assign the fan curve to your case fan
- Save the current configuration with Ctrl+S.
How to set up the mix sensor:
You can create a mixed fan curve with multiple sensors.
- Use the “+” button to create a new fan curve with different sensor. For example, select GPU temperature sensor.
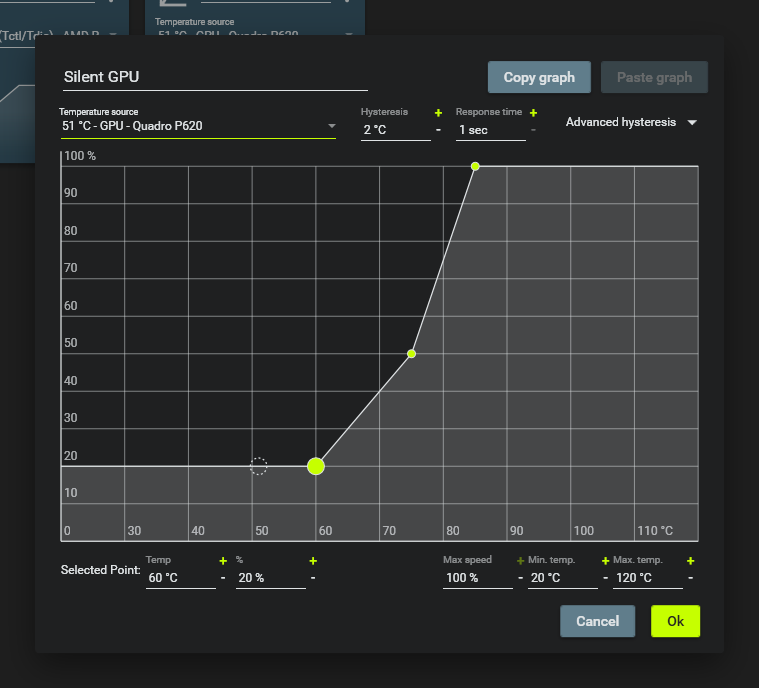
Use copy and paste function to copy fan curve
- Click “+” button, select Mix fan curve
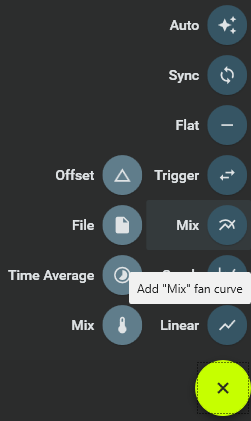
- • Choose function between Max and Average. Select fan curves: Add any existing fan curve to the mix.
- Assign the fan curve to your case fan
- Save the current configuration with Ctrl+S.
Recommended Products

